

Free Agri-Tech Tool · Solvebility
Drip Irrigation Design Calculator: Flow Rate, Pipe Size & Spacing Guide
Work out emitter flow rate, pipe size, line spacing and run time for your drip system with the calculator above, then use this guide for the formulas, charts and mistakes behind those numbers. Planning a wider system? See the full set of farming calculators.
Press Calculate to see step-by-step math
- Spacing product must be > 0
- Lateral length > 150 m will show strong warning
- Large emitter counts (>100k) will round and warn
What a Drip Irrigation Design Calculator Does
A drip irrigation design calculator turns your field measurements into three numbers you actually need before you buy anything: how many emitters to install, what flow rate your system will pull, and what pipe size handles that flow without losing pressure.
You still need to know your basics: row length, plant spacing, and the flow rate stamped on your emitters (usually 1, 2, 4 or 8 liters per hour, or 0.5 to 2 gallons per hour). Feed those into the calculator above and it does the arithmetic that used to mean a notepad, a calculator app, and a lot of second-guessing.
It’s built for a wide range of people: home gardeners setting up a raised-bed system, smallholder farmers laying out a first drip block, orchard and vineyard managers scaling a design across hectares, and irrigation contractors who want a fast second check on a client’s numbers.
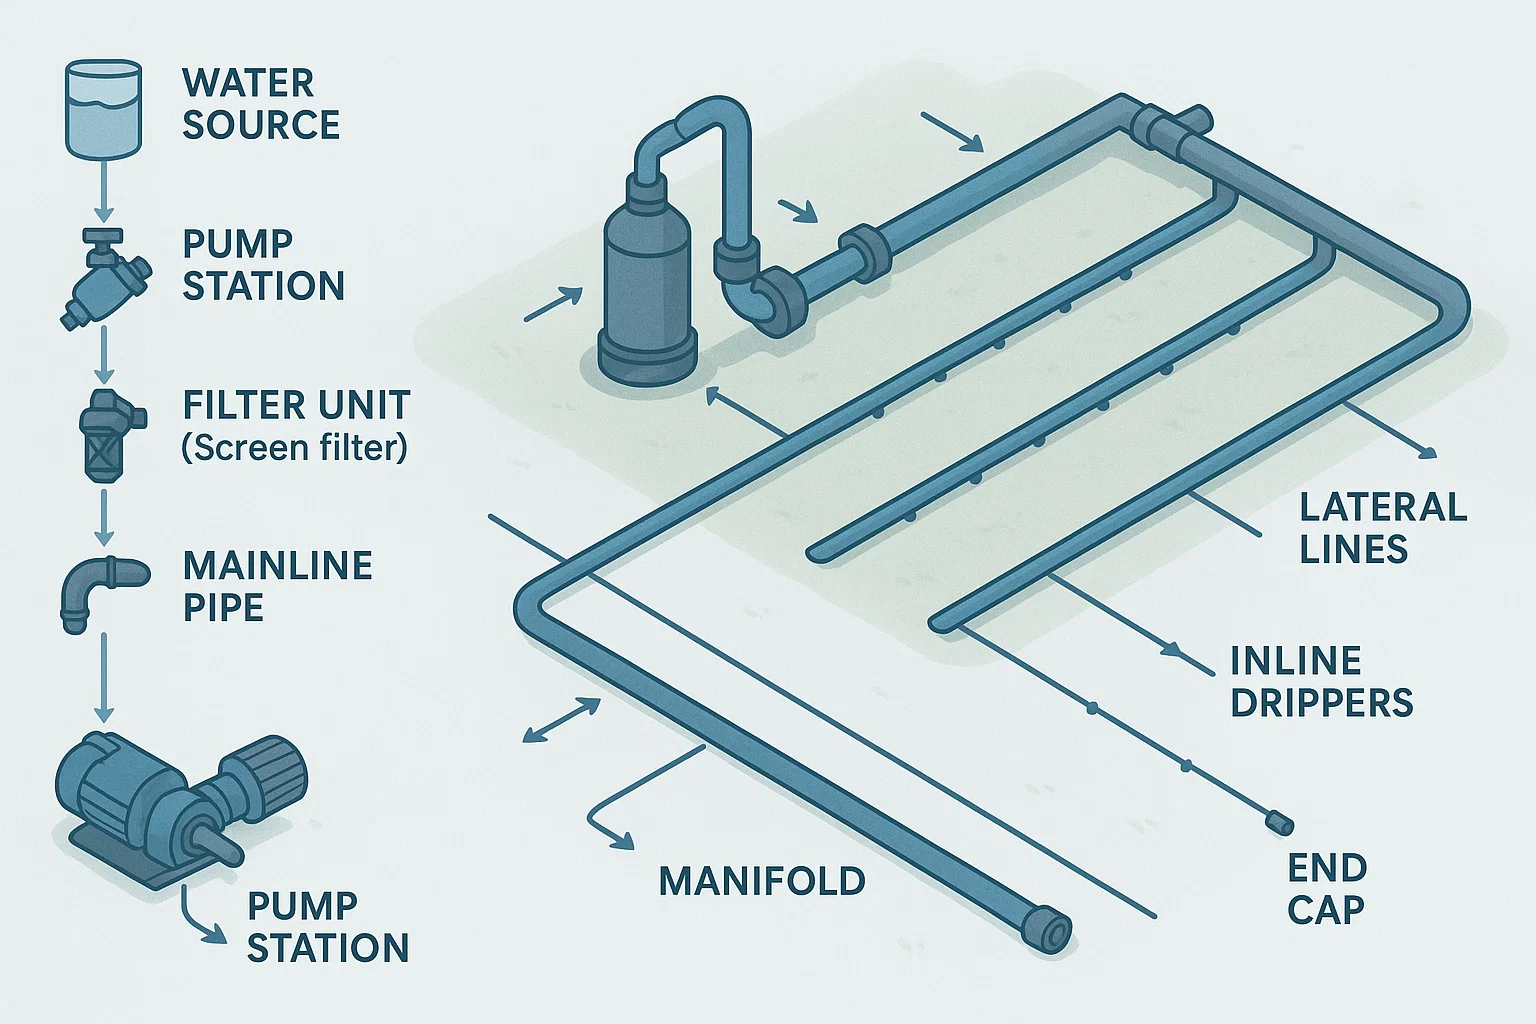
How Drip Irrigation Design Calculations Work
Every drip irrigation calculation formula comes back to the same chain: count your emitters, multiply by their flow rate, and you have your system’s total demand. From there, pipe size and pump size are just downstream decisions.
- Emitter count. Row length ÷ emitter spacing = emitters per row. Multiply by the number of rows for your total.
- System flow rate. Total emitters × flow rate per emitter (GPH or L/h) = total system flow.
- Applied water volume. Total flow rate × run time (in hours) = gallons or liters delivered per irrigation event.
- Pipe and pump sizing. Convert total flow to GPM or L/s, then match it against a velocity-based sizing chart (see below).
Quick answer: to size a drip system, multiply the number of emitters by their rated flow, multiply that by your planned run time to get water delivered per session, then size your lateral and mainline pipe so flow velocity stays around 1.0–1.5 m/s (3–5 ft/s).
If you’ve searched for a drip irrigation system design calculations spreadsheet or PDF, this is exactly what those files automate, and it’s exactly what the calculator above does for you without the spreadsheet.
How to Calculate Drip Irrigation Flow Rate
Flow rate is the one number every other decision depends on, so it’s worth getting right before you touch pipe sizing. The formula stays the same whether you’re running four emitters on a patio or four thousand across a block:
Total flow rate = number of emitters × flow rate per emitter.
Emitter flow rate is printed on the packaging, usually as GPH (gallons per hour) or LPH (liters per hour). Common ratings run 0.5, 1, 2, 4 and 8 GPH (roughly 2, 4, 8 and 16 L/h). Match the emitter to the plant: a tomato plant on sandy soil wants a higher-flow emitter and a shorter run time; a shrub on clay wants a lower-flow emitter and a longer, slower run.
| Plant type | Recommended flow | Typical spacing |
|---|---|---|
| Vegetables, row crops | 0.5–1 GPH (2–4 L/h) | 12–18 in (30–45 cm) |
| Shrubs, hedging | 1–2 GPH (4–8 L/h) | 18–24 in (45–60 cm) |
| Fruit trees, orchard | 2–4 GPH (8–16 L/h) | 1 emitter per 2–3 ft of canopy radius |
| Vines, high-density orchard | 4 GPH (16 L/h) or twin 2 GPH | 1–2 per plant |
Sizing Your Pump and Pipe for a Drip System
Pipe size
Once you know your total system flow, pipe size follows from keeping water velocity in a sensible range, generally 1.0–1.5 m/s (3–5 ft/s) for PVC or poly lateral lines. Go smaller than that and you’ll fight pressure loss and uneven flow at the far end of the row. Go bigger than you need and you’re paying for pipe you don’t need.
| Total system flow | Suggested lateral size |
|---|---|
| Under 2 GPM (7.5 L/min) | ½ in (13 mm) |
| 2–5 GPM (7.5–19 L/min) | ¾ in (19 mm) |
| 5–10 GPM (19–38 L/min) | 1 in (25 mm) |
| Over 10 GPM (38 L/min) | 1¼ in+ mainline, split into zones |
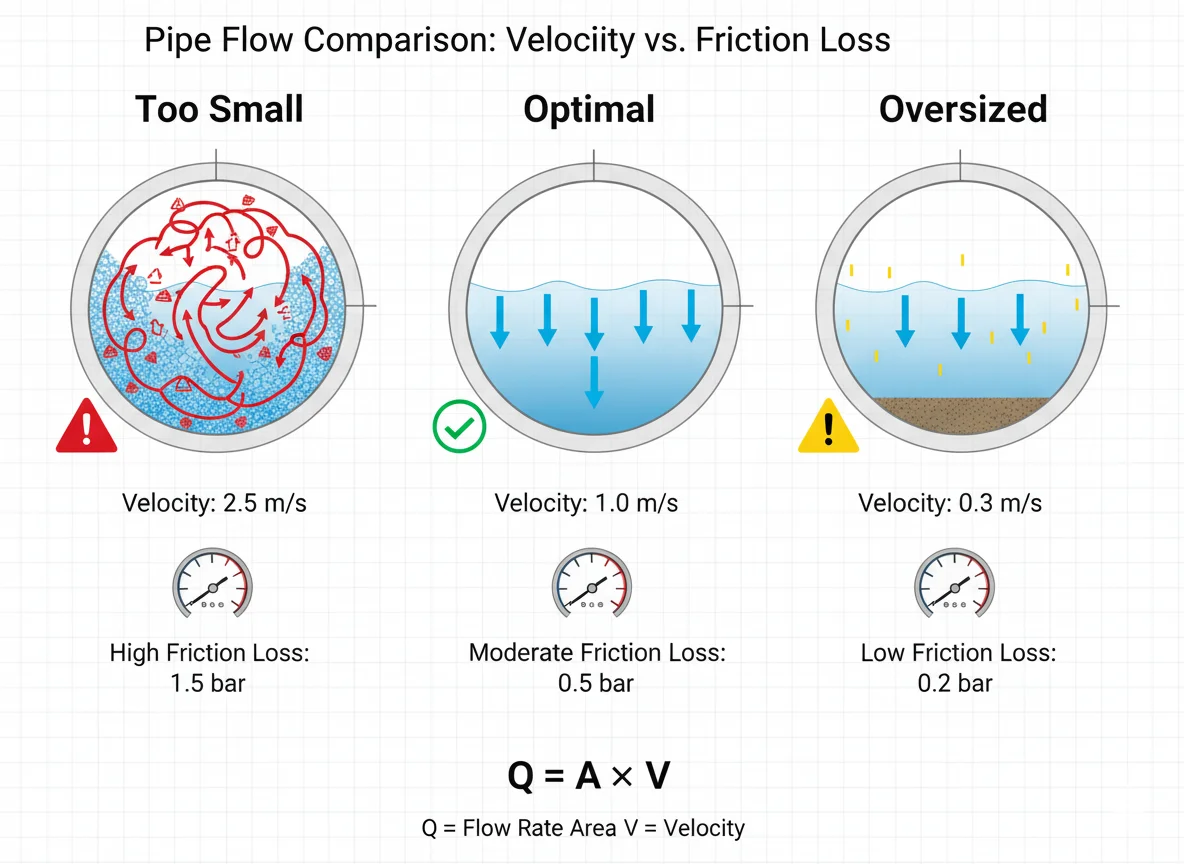
These figures are a starting point for planning, not an engineering stamp. For a large commercial block, run your numbers past your pipe manufacturer’s friction-loss tables or a local irrigation designer before you order materials.
Pump size
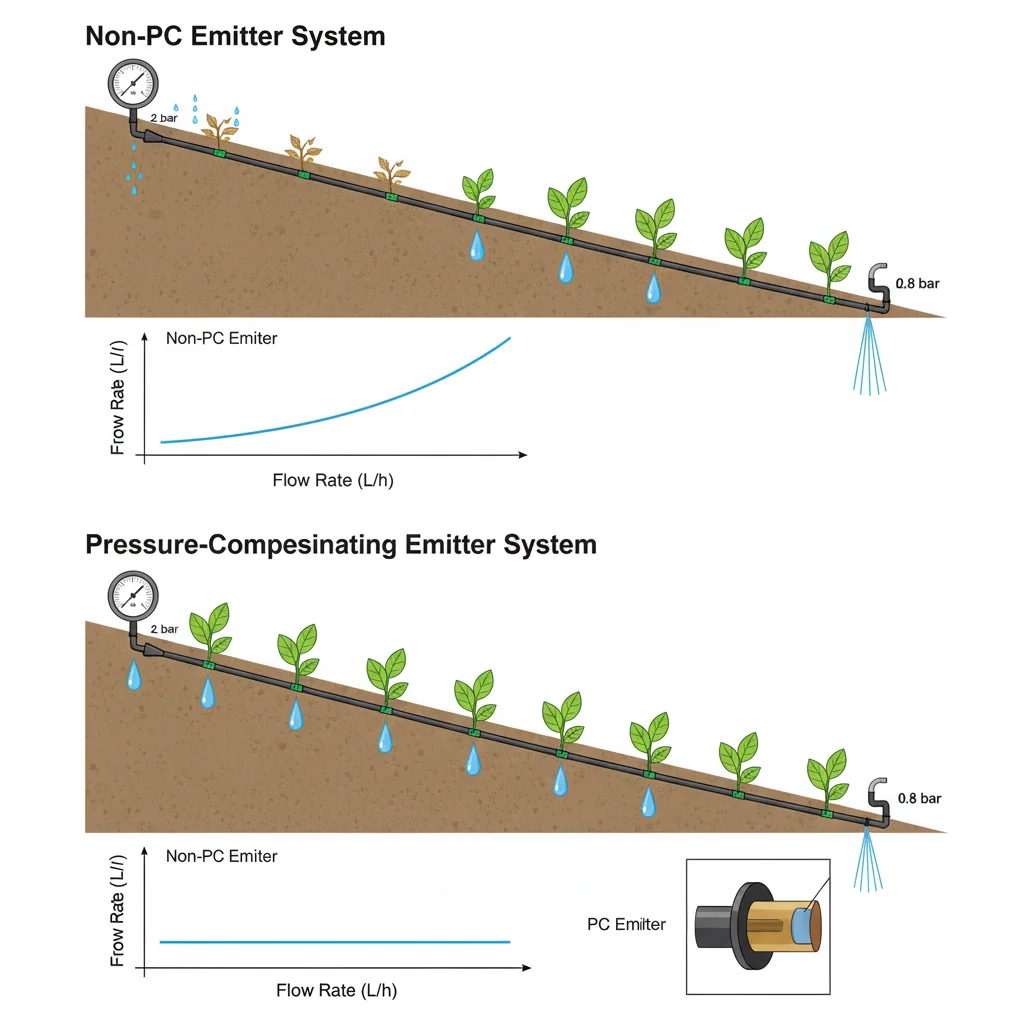
A pump has two jobs on a drip system: hit your target flow rate, and hold enough pressure at the far end of the longest lateral for your emitters to work correctly, typically 15–30 psi (1–2 bar) at the emitter, depending on the emitter type. Add up your total system flow (GPM or L/s), then check that number against the pump’s flow curve at your required pressure, not just its maximum rated flow. A pump sized only on flow, with no attention to pressure at the far row, is the single most common cause of a drip system that waters well near the tap and starves the plants at the end of the line.
If you’re planning to inject fertilizer through the system, size the pump and filtration around that flow too. Use the fertilizer dose calculator to work out how much nutrient solution you’re injecting, so the venturi or dosing pump you buy actually matches your irrigation flow.
Drip Line Spacing and Layout
How far apart should drip irrigation lines be? For row crops, run one drip line per row, centered under the plants. For beds wider than about 3 ft (1 m), space parallel lines 12–18 in (30–45 cm) apart so the wetted zones from neighboring lines overlap slightly.
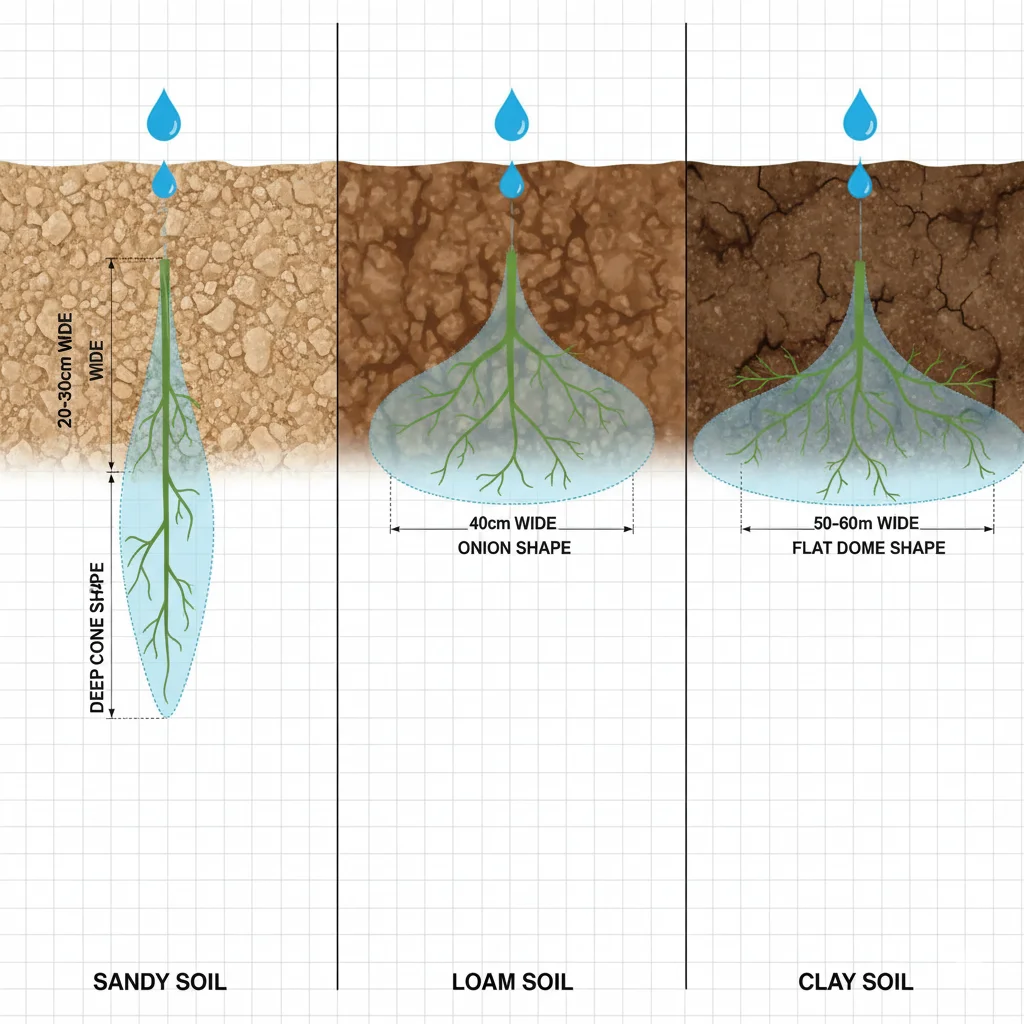
Along the line, emitter spacing depends on soil type as much as plant spacing. Sandy soil drains fast and water doesn’t spread sideways much, so emitters need to sit close to plant spacing or closer. Clay soil holds and spreads water sideways, so you can space emitters a bit wider and still get even coverage. If you’re not sure which category your soil falls into, run a sample through the soil texture calculator before you lock in spacing.
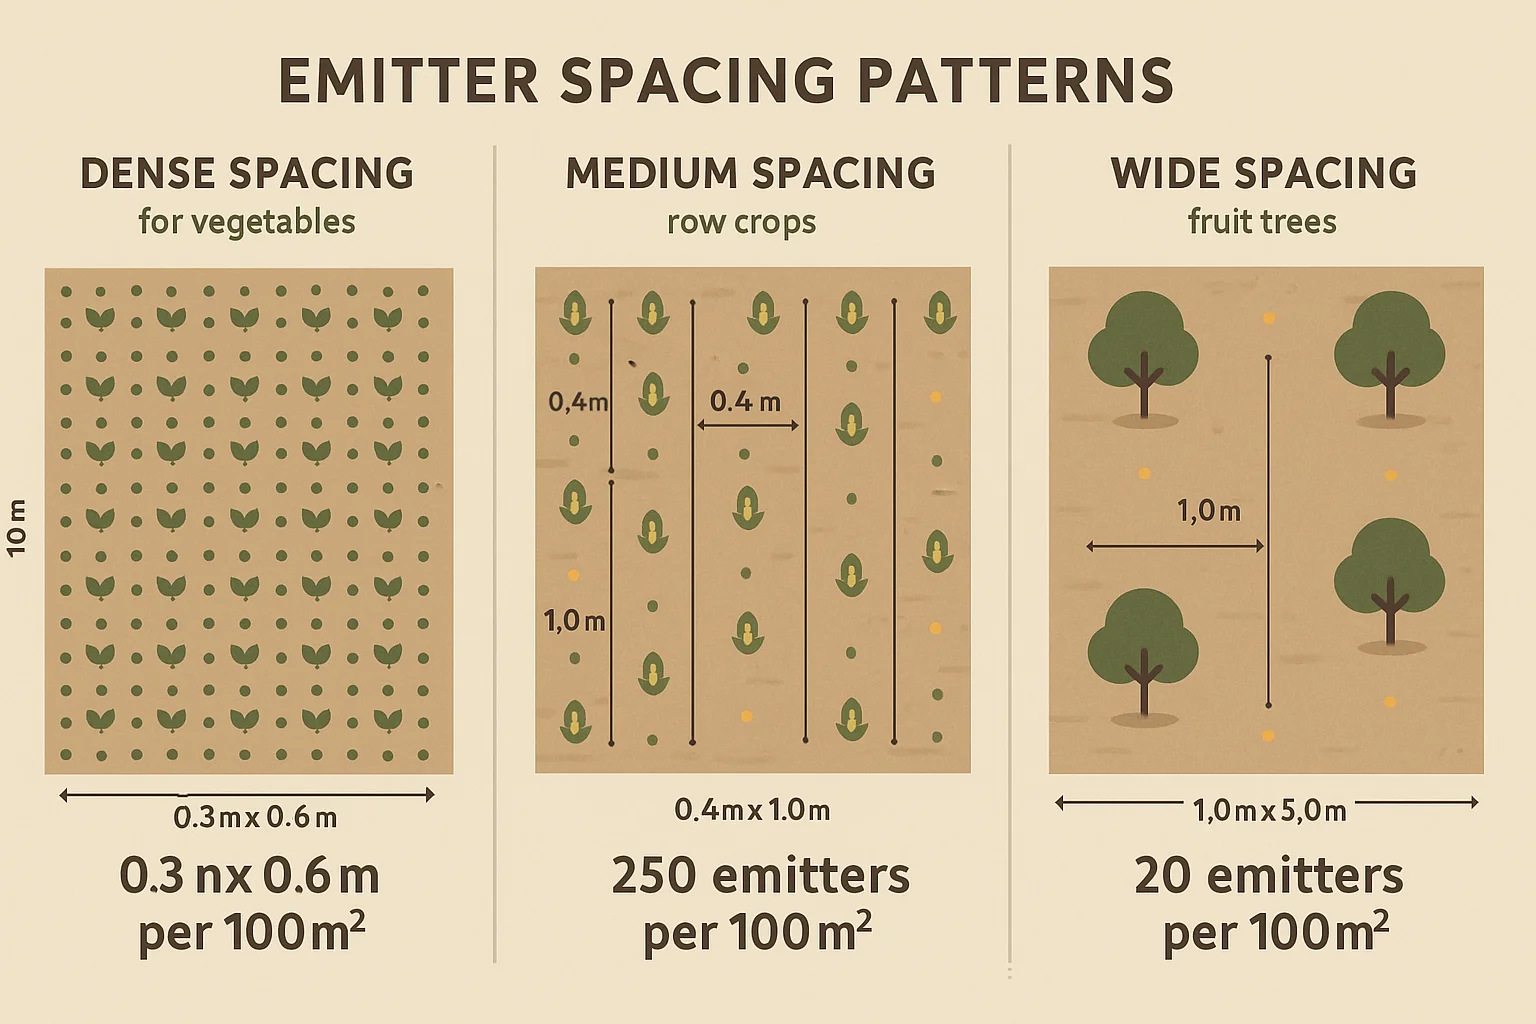
- Lateral maximum length: keep individual laterals under roughly 100–200 ft (30–60 m) for standard 16 mm tubing, longer runs need a bigger diameter or a mid-line feed to avoid pressure drop-off.
- Flow variation: for pressure-compensating (PC) drippers, aim to keep flow variation across the whole system within about 10%, PC emitters handle minor pressure swings on their own but still have a working pressure range you need to stay inside.
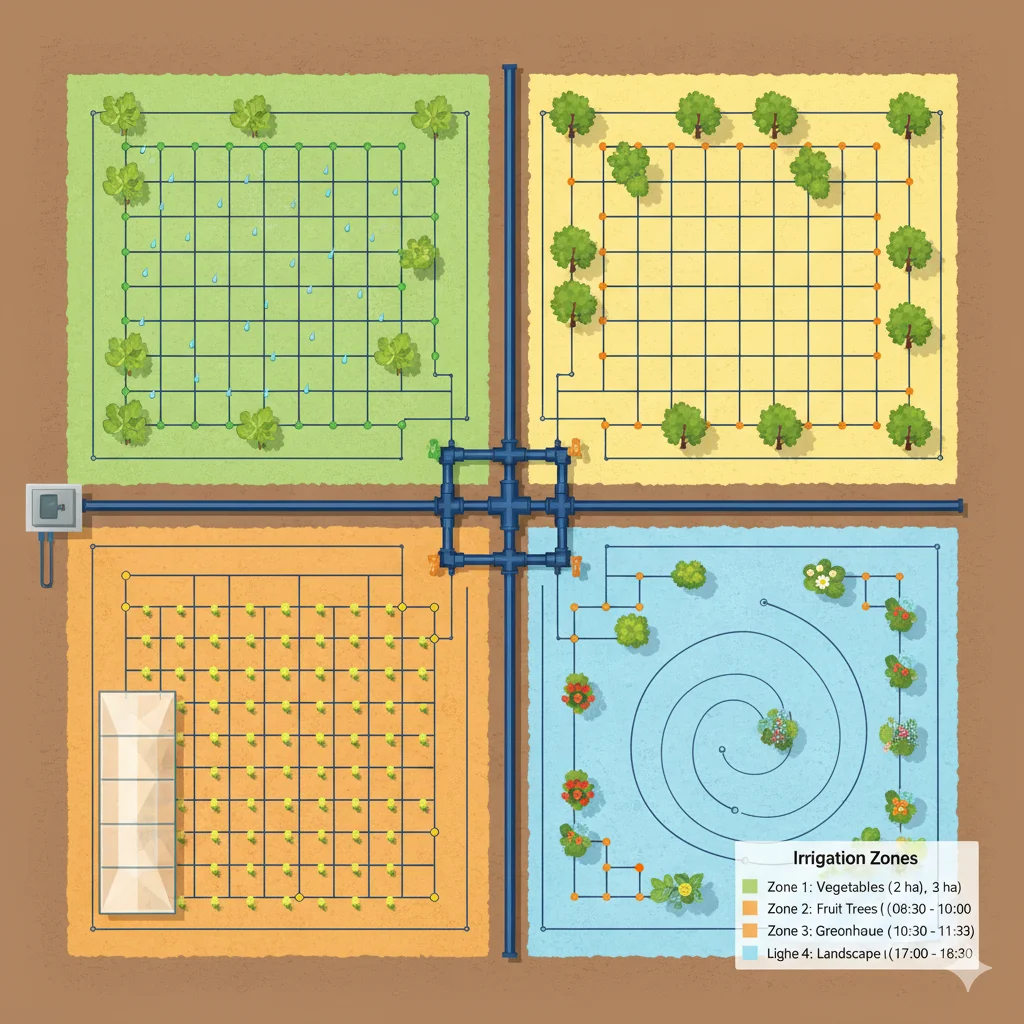
- Layout for larger plots: for a full hectare or multi-acre block, split the field into zones sized to what your pump and mainline can supply at once, then run zones in sequence rather than trying to water the entire area in a single pass.
Run Time: How Long Should You Water With a Drip System?
Run time depends on your emitter’s flow rate and how much water your crop needs that day, not a fixed number of minutes. A 1 GPH emitter needs roughly twice the run time of a 2 GPH emitter to deliver the same amount of water.
As a starting point for a garden bed in warm weather, most drip systems run 20–60 minutes per session, once every one to three days, adjusted for soil type, weather, and plant size. Sandy soil needs shorter, more frequent runs since it drains fast. Clay soil needs longer, less frequent runs so water has time to spread without pooling on the surface.
Enter your planned run time into the calculator above to see the actual water volume it works out to, then compare that against your crop’s known water requirement for the week, and adjust the minutes rather than guessing.
How Much Drip Pipe and Kit You Need Per Acre or Hectare
The honest answer is that it depends entirely on your row spacing, not the field size alone. A 1-hectare block with rows 1 m apart needs roughly 10,000 linear meters of drip line (one line per row, at 1 m spacing, across a 100 m × 100 m equivalent area). Widen row spacing to 2 m and that figure roughly halves.
For a 1-acre field with 3 ft row spacing, expect somewhere around 14,500 linear feet of drip line, again scaling directly with row width. If you don’t have exact field dimensions yet, the land area calculator will get you from a rough plot measurement or GPS coordinates to a usable area figure, then you can calculate your own linear footage from your actual row spacing rather than relying on a generic “per acre” or “per hectare” number.
What Does a Drip Irrigation System Cost?
Material cost for a basic drip system runs roughly $0.15–$0.40 per linear foot of tubing including emitters, before mainline, filtration, pump, and fittings. A small garden system might land under $150 total. A 1-hectare commercial block with a dedicated pump and filtration station typically runs from a few thousand dollars up to $10,000 or more, depending on terrain, water source, and how much automation you add.
The biggest cost swing isn’t the tubing, it’s the pump, filtration, and mainline infrastructure, especially if you’re pulling from a well or need to pump uphill. Get an accurate flow and pressure requirement from the calculator above first, then price the pump and filtration around that number instead of picking equipment first and hoping it fits.
Common Mistakes in Drip Irrigation Design
- Mixing emitter flow rates on one zone. Different flow rates on the same line mean uneven pressure and uneven watering, keep each zone on a single emitter rating.
- Ignoring elevation change. A sloped field loses or gains pressure along its length, on a meaningful slope, use pressure-compensating emitters or split the field into elevation-based zones.
- Undersizing the mainline. A lateral sized correctly still runs unevenly if the mainline feeding it is too narrow for total zone flow.
- Skipping a filter. Even clean-looking water carries enough sediment to clog emitters over a season, a basic disk or screen filter before the first zone valve prevents most of it.
- Guessing run time. Watering by feel instead of by calculated volume tends to drift toward overwatering, which wastes water and can encourage shallow root growth.
- Running laterals too long. Past the recommended maximum length for the tubing diameter, emitters at the far end receive noticeably less water than emitters near the source.
How to Use the Drip Irrigation Design Calculator
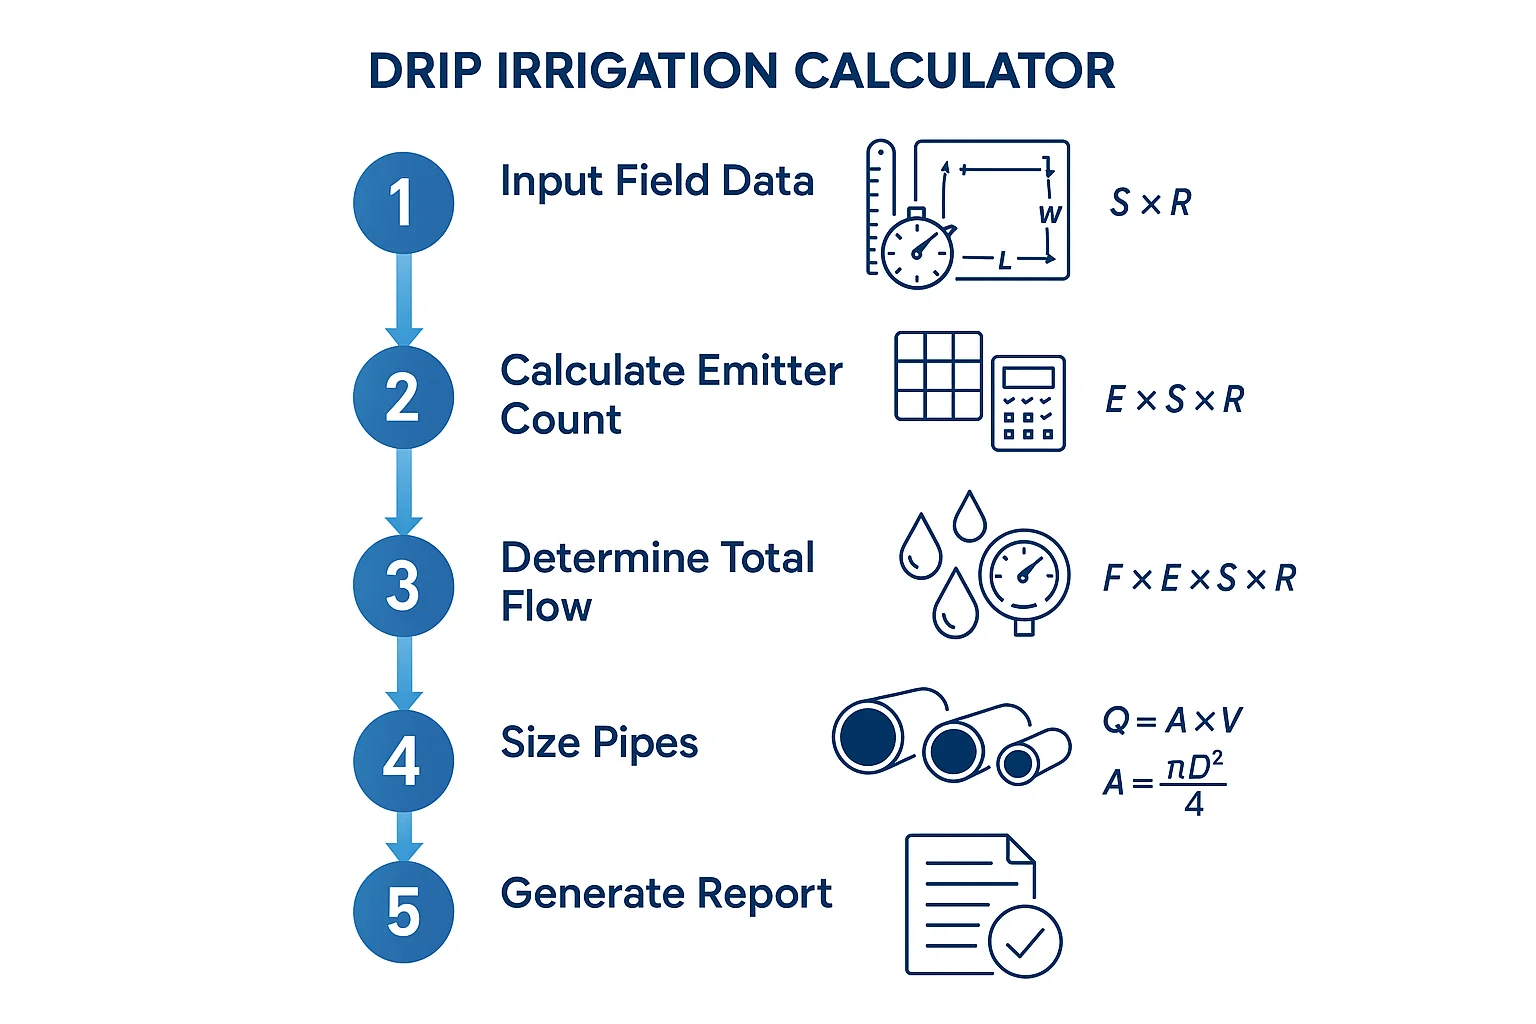
- Count your emitters, or calculate them from row length ÷ emitter spacing if you haven’t installed them yet.
- Check the flow rate printed on your emitters (GPH or L/h) and enter it into the calculator above.
- Enter your planned run time in minutes.
- Read off total system flow and water delivered per session, then check the suggested pipe size against what you’re planning to buy.
- For a multi-zone layout, repeat per zone and add the zone flows together to size your mainline and pump.
Frequently Asked Questions
What is a drip irrigation design calculator?
It’s a tool that converts your field measurements, emitter flow rate and layout into the numbers you need before installing a system: total emitter count, system flow rate, pipe size, and water volume delivered per irrigation event.
How do you calculate drip irrigation flow rate?
Multiply the number of emitters by the flow rate of a single emitter. For example, 100 emitters at 1 GPH each gives a total system flow of 100 GPH.
What pipe size do I need for a drip irrigation system?
It depends on your total flow. As a rule of thumb, use ½ in tubing under 2 GPM, ¾ in from 2–5 GPM, and 1 in from 5–10 GPM, keeping velocity around 1.0–1.5 m/s. Above 10 GPM, split the field into zones fed by a larger mainline.
How do I size a pump for drip irrigation?
Add up total system flow across every zone that runs at the same time, then check that flow against the pump’s performance curve at the pressure your emitters need at the far end of the longest lateral, usually 15–30 psi.
How far apart should drip irrigation lines be?
One line per row for standard row crops. For wider beds, space parallel lines 12–18 in (30–45 cm) apart so the wetted areas from each line overlap slightly.
How long should I run a drip irrigation system?
Most garden systems run 20–60 minutes per session, every one to three days, depending on emitter flow rate, soil type, and weather. Use your emitter flow rate and target water volume to calculate an exact run time rather than picking a fixed number.
How much does a drip irrigation system cost?
Basic tubing and emitters run roughly $0.15–$0.40 per linear foot. A small garden setup can cost under $150. A 1-hectare system with pump and filtration typically runs from a few thousand dollars up to $10,000 or more, depending on water source and terrain.
How much drip pipe do I need per acre?
It scales with row spacing, not acreage alone. At 3 ft row spacing, a 1-acre field needs roughly 14,500 linear feet of drip line. Calculate your own figure from your actual row spacing before ordering.
Reference Links
The formulas and ranges on this page follow standard irrigation engineering practice. These are the primary sources worth reading if you want the full technical detail behind any of the numbers above.
-
FAO · Food and Agriculture Organization
FAO Irrigation Manual: localized (drip) irrigation systems, planning and designCovers system layout, emitter selection and hydraulic design methodology for drip systems at field scale.
-
USDA NRCS · Conservation Practice Standard 441
Irrigation System, Microirrigation (Code 441)The US government’s baseline design criteria for microirrigation, including emitter spacing, pressure variation and filtration requirements.
-
University of California, Agriculture & Natural Resources
Drip Irrigation BasicsExtension-level guide to drip components, pressure regulation and converting an existing sprinkler zone to drip.
-
University of California, Agriculture & Natural Resources
Drip Irrigation in the Home Landscape (Publication 21579)A widely cited reference guide on drip system components, installation and troubleshooting for smaller landscapes.
Conclusion
A drip system lives or dies on three numbers: how many emitters you’re running, how much they flow, and whether your pipe and pump can support that flow all the way to the last plant in the row. Get those right and the rest, spacing, run time, cost, follows in a straight line.
Use the calculator above to run your own field numbers, check them against the charts on this page, and watch out for the common mistakes above before you order pipe. If you’re planning a larger project, the land area, soil texture, and fertilizer dose calculators cover the planning steps that sit right before and after this one.